Moogly
Creating Beautiful Things in Life

Search This Blog

Wednesday, February 13, 2013

Easy Granny Square with Center Flower

Part 1: The flower and square


This is a simple granny square measures about 5 X 5 inches. The center flower is about 2 inches in diameter. used a medium worsted weight yarn and a H hook. The flower consists of single crochet center and 8 popcorn stitches making up the pedals. I wanted a square small enough to be used in several projects, with the flower being the center piece. After making a large number a small flowers, I chose this simple popcorn flower because I love the way in stands above the square and adds a lot of dimension to the finished product. By itself it is small and plain but using it in conjunction with the square, it really pops. 

Special Stitches
Beginning popcorn: Chain 3, wk 4 dc into same stitch. Drop the loop from hook, insert hook from front to back into top of chain 3. Pick up the dropped loop. Yarn over and draw through all loops on hook. 
Popcorn: 5 dc into same space. Drop loop, insert hook from front to back into top of first dc. Pick up dropped loop, yarn over and draw through all loops on hook.
Helpful hint. Since there are a lot of color changes, it is helpful to work over as many loose ends as possible to cut down on the number of ends that need to be worked in later. 
Insert hook from front to back into first  stitch


The Flower:
For the center I chose yellow and worked the pedals in a different color.
Rd 1: (center) Like any project worked in the round, there are several ways to work this round. Choose the one you prefer. Work either 8 sc into a magic loop, slip stitch into first sc. 
2nd method: Chain 4 slip stitch into first chain. Chain 1 and sc 8 into ring. Slip stitch  to top of first sc.                           
3rd method: Chain 2, work 8 sc into 2nd chain from hook, slip stitch to first sc. Fasten off or change color for pedal  round. 
Finished Center

Rd 2: (pedals) I prefer to fasten off and start joining the new color with a sc to any sc of the first rd. This gives this flower a neater finish. (You can also with alternating color chain 1, sc into first sc.) Chain 3, sc into next stitch, chain 3, sc into next stitch. Repeat until you have 8 chain 3 loops. Slip stitch into first sc and into first chain 3 loop. 8 chain 3 loops.

Rd 3: Work beginning popcorn (see top), chain 1, into next chain work popcorn (see top), chain 1. work popcorn, ch 1 into each remaining chain. Slip stitch to the top of chain 3 of beginning pedal. Fasten off. 8 pedals made.

Back of pedals


Finished Flower


Working the square:
Rd 1: I used mint green for this round. With sc attach yarn to any chain one space between pedals. Chain 3, sc into chain 1 space of next pedal. Repeat for a total of 8 chain 3 loops. Slip stitch into first loop made. 8 chain 3 loops total.


Rd 2: Chain 3, 2 dc into same space. Chain 1, in next chain 3 loop work corner (triple crochet, chain 1, triple crochet, chain 1, triple crochet), chain 1. In next chain 3 loop work 3 dc cluster, chain 1. repeat corners, chain 1 and clusters,chain 1 (ending with corner, chain 1) Slip stitch into top of beginning chain 3 space. Fasten off. 4 leaf corners and 4 clusters made. 

Rd 3: With color of your choice (I used white) attach with slip stitch to any chain 1 space between corner leaf and first cluster of previous rd. Chain 3, 2 dc into same space. (Beginning cluster made)


Work cluster into next ch 1 space. (Skip next triple crochet and chain 1 space). Into center triple crochet of previous round, work corner (3 dc, chain 2, 3 dc). Into next chain 1 space between leaf and cluster of previous rd (skip next sc and triple crochet), work 3 dc cluster, work cluster into next chain space, work corner into next center triple crochet. Repeat pattern for end of round. Slip stitch to top of beginning chain 3. 8 clusters and 4 corners made.

Rd 4: Slip stitch into next 2 dc and into next space. Work as for previous rd. Clusters into spaces between clusters and corners into ch 2 corner spaces. Slip stitch to top of beginning chain 3. 12 clusters and 4 corners made. Fasten off.  (If you would like to make a bigger square continue rounds in this manner until square is desired size.)

Rd: 5 Using contrasting color (I used an ombre yarn matching the colors of my flowers) attach with sc to any corner space,(leaving a long tail to stitch squares together). sc in corner and in each stitch across, with 3 sc in each corner space. In last corner space work 1 sc, slip stitch to top of first sc. Fasten off, leaving long tail for attaching squares. 

Like any granny square, this square can be used for a lot of projects. I think this would make a very pretty afghan. I have already worked it into a cute summer hat and I am currently working on making a matching Tote or Shoulder bag. Will post the patterns very soon. I am in the process of assembling the Tote. Need to rework the hat. When I did my original calculations, I forgot to take the dept of the circle into account. This hat comes down to my eyes. Live and learn! 

Omitted last 2 rounds of the square. This hat has a total of 6 squares. 

Close up of the flower in the hat. 


Since these are my original patterns, please don't claim as your own. You have my permission to post the patterns on your Blog or Website as long as you link back to my Blog, giving me credit as the designer and original source. 


Thursday, February 7, 2013

Lacy Crochet Bow with Center Flower


Can you tell I love bows? Not only are bows very pretty, they are also a very versatile accessory. They can be attached to brooch pins, hair clips or sewn on, to add instant flair to any project. Someone posted a photo  of a bow on one of the crochet Facebook pages I like. Other than a few photos and Chinese symbols, there were no directions on how to make it. I liked the lacy look of this bow and after studying the photos, I had a pretty good idea of how it was made. 

This is a very easy pattern. The body of the bow consists of chain spaces and the flower is simple. One layer with 6 pedals. I used Caron Simply Soft and a size H hook. The Chinese version was made with 2 strands of fine crochet thread. My finished bow measures 5 inches by 2 inches.  I haven't tried making this bow with bulkier worsted weight yarn. I like the dainty look of the finer yarn because it gives it more of a lacy look. 

This bow is worked in the round.
Chain 60, slip stitch to the first chain, being careful not to twist the chain. 
Rd 1: Chain 3, skip 2 chains, slip stitch into 3rd chain. Repeat till the end of round, slip stitch in to first stitch.

Rd 2: I worked the rest of this bow in one continues round, using the starting tail as my guide to the end of my rounds. You can also mark the first loop with a piece of yarn. Chain 3, slip stitch into first loop. Chain 3, slip stitch into next loop. Continue in this manner until your bow is the with you need. Mine was 2 inches without the border. Fasten off.

Border: With contrasting color, attach yarn with single crochet to any chain 3 space of the last round. If you don't now how to attach with single crochet, attach yarn into center of chain, chain 1, sc in same space.


Chain 3, double crochet into the the sc you just made.


Chain 3, single crochet into next ch 3 space. Double crochet into sc just made, chain 3, sc into next space. Continue to the end of round, slip stitch into first sc. Fasten off.

Now working on opposite side of bow (60 starting chain). Attach yarn with sc to any slip stitch of the first row. Do not crochet into the spaces. Work the same as for other side only this time you crochet into the slip stitches of the first round. Fasten off, work in ends.

I like to tri- fold my bows and stitch the center so it will hold it's shape. Fold bow in half and fold top and bottom edge of the bow to the fold in the center.


To make the center piece of the bow: Chain 16, sc in 2nd chain from hook and into each stitch to end of row. Chain 1, turn. Sc in each stitch across. Fasten off, leaving a longer tail. Attach enter to bow, slip stitch closed in center of back. 


Flower: Rd 1, for center of flower, chain 4 and slip stitch to first chain or into magic ring work 16 dc. First chain 3 + 15 dc. Slip stitch to top of chain 3. Fasten off.

Rd 2: With contrasting color attach with sc to any dc of previous round. Chain 4, skip 2 dc, sc into next, chain 4 skip next 2 dc, sc into next. Continue till end of round, slip stitch to first sc. 6 chain 4 loops. 


Rd 3: Chain 1, sc into first loop, 1 hdc, 2 dc, 1 triple crochet, 2 dc, 1 hdc, 1 sc into same loop. (first pedal made.), sc into next loop and repeat as for 1st loop. Make 4 more pedals, slip stitch to first sc. Fasten off. 

Work in ends, leaving one tail for attaching flower to bow. Center flower to center of bow and sew in place. 


The size of this bow can be easily changed by adding more sc to round 1 in multiples of 3 and adding more rounds to the bow. 

Wednesday, February 6, 2013

Easy Crochet Spring/Easter Hats - Free Pattern

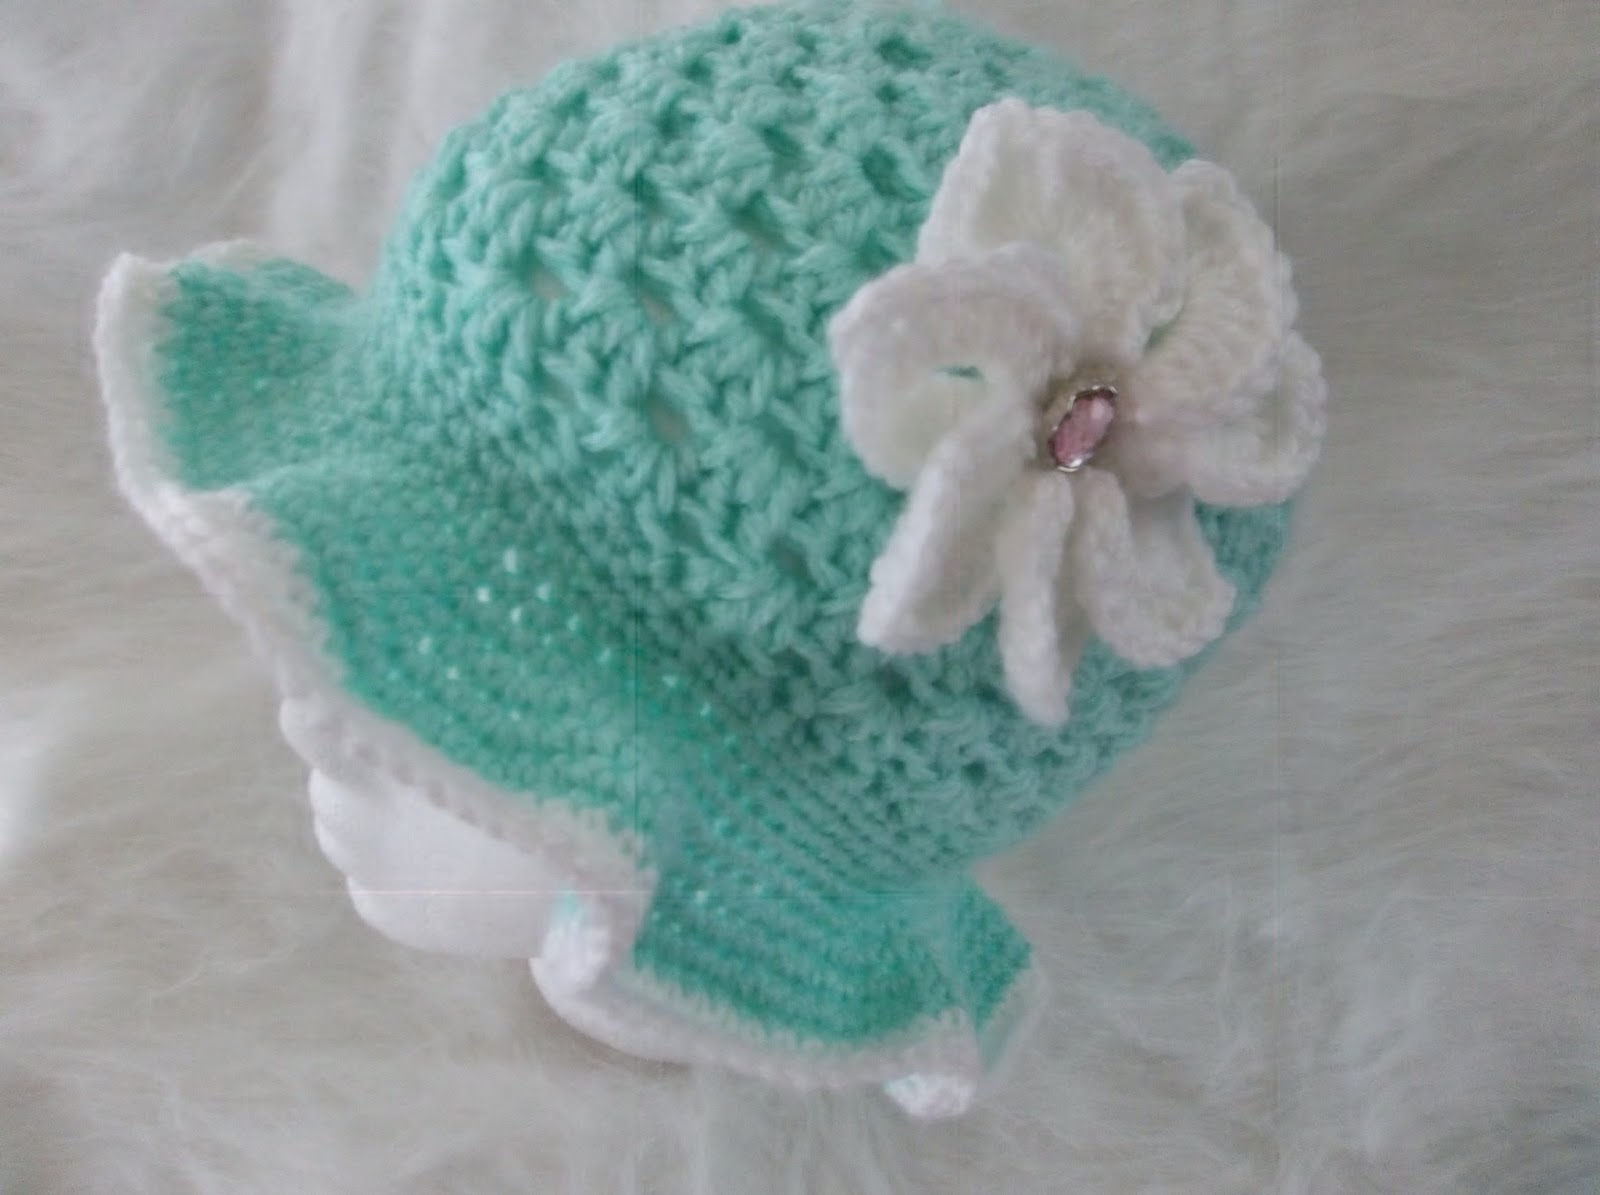
According to the Groundhog, winter is almost over. I for one, am ready for spring. When I was organizing my stash of yarn, I found a few skeins in pretty pastel colors. Just what I needed to deal with the winter blahs. Since I had just purchased a few more skeins of white, I decided to make some pretty hats for spring.
Less than a couple of hours later, the first one was finished.


These hats are very easy to make. If you know how to work a simple Granny Square and you can single crochet, making this hat is a breeze. How do you turn a square into a round? All you need to do is to offset your corners. I work my corners into the space right after the last corner of the previous rows. This is only done on increase rounds. Once you have the desired size of your circle, the body of the hat is worked, without any corners. 

Since the body of this hat is worked in double crochets witch are taller stitches, you may need to experiment with different sizes of you hooks or using thinner or thicker yarns to get the size you need. I used Caron One Pound Baby and a size I hook. It is a worsted weight yarn. Since I crochet fairly tight, I usually go up one size in hooks, than is recommended for the yarn. If you crochet loose, you may want to use a slightly smaller hook.

If you like your brim to have a more ruffled look, simply increase the number of stitches in the beginning of the brim. To keep it flat, make fewer increases and work more single crochet rounds, without adding any extra stitches between your increase rounds.  Experiment and in no time you can design your own hats without having to use a pattern. 

The size of hat I wrote the pattern for, should fit a teen/small woman. It took 6 increase rounds. To work this for a toddler, you would only need 5 increase rounds. For teens and adults, add 1 or to increase or corner rounds to get the size you need. 


Body of the hat

With Magic Circle or chain 5 slip stitch to first chain to form a circle.
Rd 1: Chain 3, 2 dc, ch 1, 3 dc - first cluster made, (ch 1, 3 dc, ch 1) repeat 3 more times. Slip stitch to the top of ch 3. 12 dc and 4 ch spaces.

Rd 2: Slip stitch over next 2 dc and into first chain 1 space. ch 3, 2 dc, ch 1, 3 dc (first corner made). 3 dc, ch 1, 3 dc in next 3 ch spaces. Slip stitch in top of beginning ch 3. 24 dc and 4 ch spaces.

Rd 3: Slip stitch next 2 dc and into next ch space. Chain 2, 2 dc in ch space, * in space before next 3 dc group work corner (3 dc, ch 1, 3 dc), in next space 3 dc*, repeat *-* 3 times, slip stitch to top of chain. 36 dc and 4 chain 1 spaces

Rd 4: Slip stitch into first space, ch 2. 2 dc into first space, 3 dc in next space (corner space of previous rd.), 3 dc, chain 1, 3 dc in next space. 2 dc in each of the next 2 spaces, work corner into next space. Repeat till end of rd. slip stitch. 48 dc and 4 chain 1 spaces.

Rd:5 slip stitch into first space. Ch 2, 2 dc, ch 1, 2 dc in same space, work 3 dc in next space, 3 dc in next space, 3 dc in next space, 3 dc, ch 1, 3 dc in next space. Repeat to end of rd. 60 dc 4 chain spaces 


Rd 6: slip stitch into first space, ch 2, 2 dc, ch 1, 2 dc in same space. If you are still increasing your circle, work pattern as before. 3 dc groups in spaces and corner (3 dc, ch 1, 3 dc) in spaces following corner of the previous round. Once desired circle diameter is reached, work rounds with groups of 3 dc only. No chain spaces between groups. 

To get a child sized hat I had to do 5 increase rounds and my flat circle measured 6 inches. For size teen or small woman I needed to do 6 increase rounds. If you are having a hard time getting the circle measurement you need, go up or down a size in hooks, or skip 2 corners on the last increase rd. Working the pattern -make corner, skip next corner, make corner, skip last corner. This way you are only gaining 6 stitches instead of 12. 

For Teen/Small woman I needed to do 16 rounds total. Since I am adding a large brim the measurement of my hat was 7 inches deep. Shorter than I would have done for a beanie. 

Brim: I worked 6 increase rounds for a total of 72 stitches for the body of the hat. The brim is worked in single crochets and increases throughout the rounds of the brim. The pattern I use is to gradually increase the number of stitches in my rounds.

Rd: 1 single crochet in each stitch around. Mark last stitch since you are now working in continues rounds. 

Rd 2: Sc first 8, 2 sc in next stitch, repeat through end of rd. 80 sc

Rd 3: Sc first 7, 2 sc in next stitch, sc next 8, 2 sc in next, sc next 8, 2 sc in next, repeat increasing every 9th stitch) till end of rd. 89 sc.

Rd 4: Sc first 8, 2 sc in next, sc in next 7, 2 sc in next, sc in next 7, repeat increasing every 8th stitch, till end of rd. 100 sc

Rd 5: sc in every stitch 100 sc

Rd 6: sc first 8, 2 sc in next, sc in next 6, 2 sc in next, sc in next 6 sc, 2 sc in next. repeat increase every 7th sc, in last repeat you should have 8 stitches work increase in last. 114 sc

Rd 7: increase every 6th stitch 133 sc 

Rd 8: increase every 6th stitch, last repeat work repeat into last (7th) sc. 155 sc

Rd 9: sc in every stitch across 155 sc

Rd: 10: work increase in every 5th stitch 186 sc 

Rd: 11: work increase every 5th stitch last increase 6th stitch 223 sc

Rd 12: work increase every 4th stitch, last increase in 3rd 278 sc.

Rd: 13 sc in every stitch  278 sc

Rd: 14: work increase every 3rd stitch, last increase in 2nd stitch 370 sc

Rd: 15 and 16, sc in every stitch.

Add border of your choice. I like using a simple scallop border for my hats. The pattern is very simple.  Single crochet into first stitch, Chain 2, double crochet into same stitch as single crochet, skip 2 stitches, single crochet into 3rd stitch, chain 2 double crochet into single crochet, repeat until end of rd. slip stitch into first double crochet. 

If you used fewer or more increase rounds on the body of the hat, the pattern for increasing rounds in your brim is much the same. The sc makes for a dense and stiff brim. Work your increases as close as possible to the increases of the previous rounds. By keeping the increases close together, it creates a wave. If you like a more ruffled look, start by increasing rd 2 every 3rd sc instead of every 9th. Work sc rounds for most of the rest of the brim. If you gain or loose a stitch in any rd of this brim, it's no big deal. No need to find the mistake and re-do. I don't use a pattern, I simply work by feel. This is just to give you an idea of how to do it. 

Flowers: Pattern for flower in first photo I found at: http://bonitapatterns.tumblr.com/post/22424919278/here-goes-a-free-pattern-for-a-croco-flower-its
Flower for last (pink hat) Free Irish Rose pattern http://www.maggiescrochet.com/free-patterns-c-33.html?zenid=8df875fcc51ad47258b6540e47134139
Flower for Peach hat is a simple 3 layered flower. Pattern is easy to find, I crochet it without a pattern.
Be creative, have fun. Decorate your hat with your favorite flower or accessory. If you have any problems working this pattern or find any mistakes, please let me know. I will be glad to help you along as much as I can. 

 Please don't copy and redistribute this pattern or my photos as your own. 


Wednesday, January 23, 2013

How to Crochet a Simple Granny Square

Melani, here are the instructions on how to do a simple Granny Square. It is crochet in the round. The nice thing about this pattern is, once you have the first couple of rows done, the pattern repeats itself into infinity. My Mother in Law learned how to crochet in her 50's. Doing this version of the Granny Square is the only pattern she knew. After a few years her house was covered in colorful Afghans of Granny Squares.

There are several ways of starting the ring. One way is to crochet into a Magic circle. Another one is to make a ring of chains joined into a circle. 

Either make a Magic Circle or Chain 5, slip stitch into 1st chain to create a circle.

Row 1: Chain 3 (counts as first double crochet), in same space (2 Double crochets, chain 2, 3 double crochets), chain 2. In next 3 chain 2 spaces (3 double crochets, chain 2, 3 double crochets, chain2) . Slip stitch into the top of beginning chain 3. Now you should have a total of 12 double crochets and 4 chain 2 spaces.


There are several ways of working the beginning corner. I think the easiest way for a beginner is the following...
Row 2: Slip stitch over the next 2 double crochets and into the center of the first chain 2 space. Chain 3 (first double crochet), work 2 double crochets, chain 2, 3 more double crochets into the same space (first corner made), chain 2, (3 double crochets, chain 2, 3 double crochets)* into the next 2- chain spaces, chain 2. Slip stitch to the top of beginning chain 3. (Total of 24 double crochets, 8 chain 2 spaces.)


Rd. 3: Chain 3, 2 double crochets, chain 2, 3 double crochets into first corner, chain 2,* 3 double crochets into next space, chain 2, work corner (3double crochets, 2 chains, 3 double crochets), chain 2*. repeat from *-* 3 times. Slip stitch to top of chain at the beginning of the round. (Total of 36 double crochets and 12 chain 2 spaces.)


Continue in this pattern. With each consecutive round you should gain 1 double crochet cluster and 1 chain 2 space on each side of the square. (Adding a total of 12 double crochets and 4 chain 2 spaces in each round.) Hope this helps.


Tuesday, January 22, 2013

Crochet Ribbon and Hearts Hatbands

Hi everyone, hope you all had a great weekend. Since Valentines day is just around the corner I decided to make some headbands for my grand daughters. These headbands worked up very fast and are easy to make. I wanted a design that allowed me to use ribbon in the band and had a border worked in, rather than added to it. I tried several variations and they all worked out well.


Supplies: Worsted Weight yarn
Size H Hook
Ribbon (I used ¼ and and 5/8)
Embellishments of your choice


Measurement: 1 ¾ inches wide, length about ½ inch to 1 inch shorter then circumference of head.
Stitch gauge not necessary

Stitches used: chain, single crochet (sc), slip stitch
Turning Picot: chain 2, slip stitch 2nd chain from hook, chain 1

Instructions:
For ¼ or 3/8 ribbon size chain 6, for 5/8 ribbon chain 5.

For ¼ or 3/8 ribbon:
Rd. 1: sc in second chain from hook, chain 2, skip 2 chains and sc in last chain (infants)
sc in second chain from hook, sc in next chain, chain 2, sc in last 2 stitches, work Turning Picot
(chain 2, slip stitch in 2nd chain from hook, chain 1),
turn work.

Repeat this round until desired length is reached, ending with turning picot. Slip stitch both ends
together (ending with 1st chain of first turning picot made), break yarn.

For 5/8 ribbon: chain 5, sc in second chain from hook, chain 3, skip 2 chain, sc in last chain, make turning picot.


Ribbon: Since ribbon doesn't stretch, it needs to be the size of the circumference of the head + 2 inches for securing ends. I added another 1/2 inch to an inch to allow for growing room. The Headband will stretch to accommodate the ribbon. Thread ribbon through loops. (I started with the joined section of the band.) Up through the wrong side, over 2 loops, under 1 loop; repeat. I stretched the headband slightly before cutting the ribbon. Leave about 1 inch tail of ribbon on each end. Sew ends of ribbon together on wrong side. Don't forget to singe ribbon to prevent fraying. For added security sew end pieces of ribbon to the inside of the band.


If you want to use the headband without appliques or clips, rows should end in multiples of 3. Otherwise you may run 1 or 2 loops short when threading your ribbon. Appliques and hair clips applied over the seamed area, will not only hide the seam but also any shortfall of loops.

I am still writing up the patterns for the hearts I made. Should be able to post those later in the day.
Unless I specify that I used  a pattern created by someone else, the pattern is my original. You are free to make or sell products made with any of my patterns. Please don't redistribute or claim my patterns as your own.

If you need help with any of my projects or are stuck on a project of your own, please leave me a message and I will try to help you along as much as I can.


                                           Appliqued Hearts Patterns

Double Heart: Either use the magic ring or chain 4, slip stitch for form a ring.

Rd.1: Chain 4, in loop work 2 trbc crochets, 4 dc, chain 1, 1 trbc crochet, chain 1, 4 dc, 2 trbc crochets, chain 4, slip stitch to center.

Rd 2: Do not turn work. Chain 1, skip 1st stitch (1st chain of 4 beginning chain 4 of previous rd.), 2 sc in next 3 stitches, sc in next 7 stitches, (1 hdc, 1 dc, 1 hdc) in next stitch, sc in next 7 stitches, 2 sc in next 3, chain 1, slip stitch into center of ring.

Rd. 3: turn work, slip stitch into the first stitch, sc in next stitch, 2 hdc in next 5 stitches, 1 hdc in each of the next 7 stitches, 2 dc in point of heart, hdc in next 7 stitches, 2 hdc in next 5 stitches, 1 sc, chain 1 skip next stitch and slip stitch into last, slip stitch into center, break yarn.

Make 2 hearts. I used alternating color in rd. 3 of second heart. Overlap hearts and stitch together.  


Ruffled Heart:

Work rounds 1 and 2 for Double Heart, break yarn. Use contrasting color. Do not turn work. Slip stitch into first stitch, chain 3 – work dc into same stitch. 2 dc in each stitch around. In last stitch, dc chain 3 slip stitch into same stitch, break yarn.


Lacey Heart with Flower: Either use the magic ring or chain 4, slip stitch for form a ring.


Rd. 1: Chain 3, 15 dc in ring, slip stitch to the top of chain 3.

Rd. 2: chain 1sc into same stitch, chain 2, (hdc, ch 1) in next 2 stitches, (sc, ch 1) next 4 stitches, (dc, ch1, dc) in next stitch, (sc, ch 1) next 4 stitches, (hdc, ch 1) next 3, slip stitch in center of heart.

Rd 3: ch 1, sc in next space, ch 1, (dc, ch 1) next 3 stitches, ( hdc, ch 1) next 4 stitches, (dc, ch 1, dc) in next stitch, (hdc, ch1) next 4 stitches, (dc, ch1) next 3 stitches, chain 1, slip stitch in center.

Rd 4: chain 3, sc in next space, ch3, (hdc, ch 3) next 3, (sc, ch 3) next 5, (dc, chain 3) next stitch, (sc, ch 3) in next 5, (hdc, ch 3) next 3, sc in next, slip stitch in center.

The flower I used for the center came from a pattern I found at : http://easymakesmehappy.blogspot.com/2010/07/6-petal-puff-stitch-flower.html

I did change the first row of her pattern from sc to dc to accommodate my grand daughters request for a big rhinestone in the center.  

 If you find any errors in my patterns, please let me know.                  


Monday, January 21, 2013

Accessorize Your Hat - How to Crochet a Bow

                                  Part 2 - How to Crochet a Bow


There are a lot of different ways to make bows. The one I am going to show you today is a simple bow made out of two crochet rectangles. The larger rectangle for the actual bow and the smaller one for the center loop. To make this type of bow, I prefer to use thicker worsted weight or bulky yarn. I also use a hook one or 2 sizes smaller than recommended for the yarn I am using. It makes the material stiffer, holds it's shape better and is less likely to curl. For the bow I made for this hat I used Sensations Rainbow Classic. It's a  bulky yarn, but very soft. I used a J crochet hook. For the finer worsted weights I usually double and work with 2 strands.

For this bow I started with a chain of 15. Worked in all single crochets. The dimensions are 14 stitches across for 11 rows. My rectangle measures about 5 inches wide by 3 inches high.


Start with chain of 15, sc in 2nd chain from hook, sc in each stitch across.
Chain 1 and turn.  11 rows.


Fold your rectangle in half lenghtwise and finder the center.Fold each long edge in meeting at the center fold. Pinch the middle and secure with a few stitches to hold the bow together.


Fold in half lenghtwise. Fold long ends to center fold 


For the smaller rectangle I started with chain 5, sc in the second chain from hook, sc in each stitch across, for 4 stitches by about 9 rows. Sorry, forgot to count my rows. I measure my work around the folded bow until it fits all the way around. Then I slip stitch the center band together in the middle of the back of the bow.  Weave in ends, leaving on long tail to attach the bow to the hat. 


This simple bow adds a little flair to the hat. Next up making and attaching braids.

Saturday, January 19, 2013

How to make Pom-Poms and Braids for Your Hats

Part 1 - Pom-Poms


Pom-Poms and braids are a popular way to add flair to any hat. My grand kids love pom-poms and I made quite a few of them in the last few months. If you don't make a lot of them it wouldn't pay for you to invest in a pom-pom maker. I have to say, I am in love with mine. Making a good size pom with cardboard circles is a little time consuming. It takes me about 15 to 20 minutes to get a nice and fluffy one the old fashioned way.  With my "toy" it only takes about 2 minutes.

Assuming you don't have the luxury of a pom-pom maker, I am going to show you how to make a pom, using a cardboard template. Any stiff cardboard, such as a shoe box will suffice. Using a compass, glass or any round object the size you would like your pom-pom to be, trace 2 circles onto the cardboard. With a another smaller round, object draw a bulls-eye in the center of each circle. Cut the circles out and remove the bulls-eyes. What you are left with, are 2 identical cardboard doughnuts. 


Used a can of tuna for outer circle, bulls eye should measure about 1 inch.

As you can see, mine aren't what you would call professional but they will do the job. The goal is to wrap the doughnut with yarn, until the hole in the center fills up with yarn. For this template I used the lid of a tube of Vaseline. It measures 11/2 inches in diameter. This was actually a little to big. For this size pom, a center opening of 1 inch would have been better. I like to completely wrap my pom about 5 times. Making Poms for over 40 years, I developed a feel for it. Once my circle fills up and my disc feels nice and puffy, I know it's right. If you think you have enough yarn wrapped around the doughnut but your center isn't full, not all is lost. In this case all you need to do is to take a needle with some yarn and run it around the inside of the circle several times,pulling tight and catching all of the loops. This keeps your loops from falling through the hole when you cut your pom open. If the center if full, this step will not be necessary. The more yarn, the fluffier the pom-pom will be. Holding both pieces of cardboard together, thread the needle through the center of your doughnut. Knot the end to keep it secure. Now comes the fun part, wrapping and wrapping around the circle. When you run out of thread, join the new thread with a knot. It can be cut off later, when you trim your pom. Once your cardboard circle is full, cut the thread. 


Now it's time to cut the loops. To separate the strands, cut the yarn around the top edge of the template, all the way around. Do not cut the cardboard.


Now cut a piece of yarn about 18 inches and slide it between the center of the 2 discs. This is how you tie off your pom so you don't end up with a pile of loose strings. Wrap the yarn around the center at least 4 or 5 times. Pulling as tight as you can. Knot it several times but don't cut you string. I use it to sew my pom to the hat. Now cut the cardboard circle to remove the finished pom. You might be able to carefully pull the circles apart and save your template. Trim the pom even if you have some larger strands and carefully cut out any knots.


These colors work for both a boy and a girl. I decided to use it for a girl and accessorize it accordingly. I think a pretty crochet bow would look very nice. Bows are very easy and can be done many ways. Next up tutorial on how to crochet a bow for your hat.


Pom-Pom maker I purchased at JoAnnes. Came in a set of 2 sizes for $19.99 with 50% off coupon only about $10.00. This is the large set. Purchased the small set at Hobby Lobby for $8.00 regular price. Easy to use and a great time saver if you make a lot of Poms.